Research and planning rule the show in the field of User Experience and Product Development. Neglecting either of them will backfire on you and your organization. How? With high user abandonment, increased need (and cost) for customer service, increased cost and time for development. In short, you should use all available resources wisely. But what can you do when deadlines are near, and the budget is low? You can start Guerrilla Usability Testing – a lean and agile approach to testing that doesn’t break the bank. Here’s a 7-step guide to guerrilla user testing.
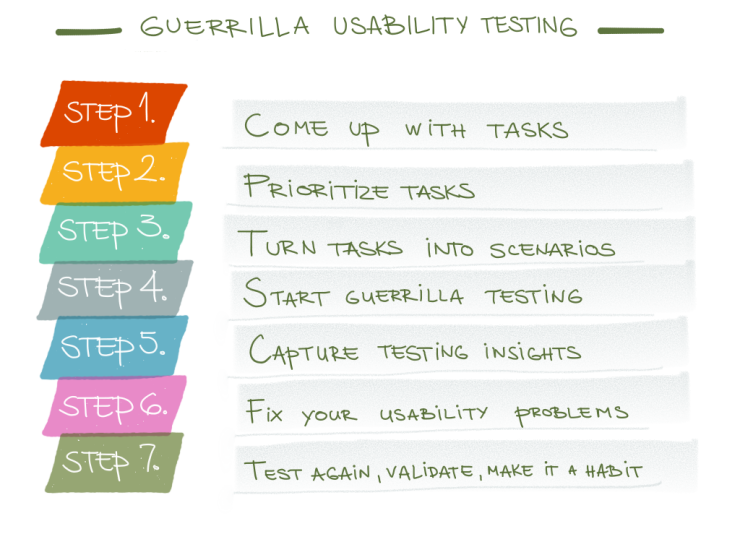
In 7 simple steps, we will show you how to conduct Guerrilla Usability Testing to get the maximum out of it:
- Step 1: Come up with a list of tasks
- Step 2: Prioritize your tasks
- Step 3: Turn those tasks into scenarios
- Step 4: Start guerilla testing
- Step 5: Capture user testing insights
- Step 6: Fix your usability problems
- Step 7: Test again, validate, and make user tests a habit
But first, let’s answer the 3 most common questions about guerrilla usability testing:
How does guerrilla testing work?
The main goal of guerrilla testing is to find errors and fix them as quickly as possible.
Guerrilla usability testing is easy to set up because of the following:
- You don’t need expensive recording equipment or a research lab.
- You don’t need to get test participants to come to you (which includes travel costs, arrangements, schedules, and often cancellations)
- You don’t need to deal with paperwork and administration.
- You don’t need to worry much about recruiting testers in your target audience demographic.
The right people for guerrilla testing are the people available right now. This makes guerrilla testing extraordinarily lean and agile. You can get insight in as little as a couple of hours.
The sessions are concise (about 15 minutes) and compressed.

Here’s the perfect scenario for a guerrilla user test:
- You approach a person.
- Ask them if they would like to answer a few questions about your product.
- Then give them a couple of tasks to complete.
- Observe their interaction.
- Ask about their experience.
- And you’re done.
Because you’re collecting qualitative data during the tests, you only need 3 to 5 testers to spot the most significant usability issues.
Discovered usability issues can be improved immediately, and then you can test the improved design in the following testing round.
Guerrilla research, therefore, is the perfect starter drug for stakeholders who struggle to acknowledge the value of usability testing.
It’s more palatable for stakeholders to invest a few hours and some spare change on a guerrilla test rather than spending a fortune on a full-blown usability study.
Also, traditional moderated usability studies can take months to plan and execute, which is a big turn-off, especially if the team has a short deadline and a limited budget.
Remember: some insight is better than no insight. So even if your research is quick and straightforward, it’s infinitely better than no research at all.
Where do I find the right participants for guerrilla user testing?
Compared to a traditional usability study, participants for guerrilla tests are not recruited; you just approach them. The easiest way to find participants is to use your family or friends as testers. After all, they can’t escape that easily because you know where they live. 😉
Unfortunately, your close friends and family often know too much about you and your product, so getting a true first-time user experience from them is difficult. Also, your mom or old aunt Sheila may be too kind to hurt your feelings… Therefore, it’s often better to test with new participants who know nothing about you or your product. Perfect places to find such people are locations where people are naturally in a good mood, like coffee shops or shopping centers.
Pro Tip: Pick a location with a stable Wi-Fi connection if your prototype or website is online. You shouldn’t forget your charging cables or additional power packs as well. You don’t want to run out of battery during a test.
“You shouldn’t ask anyone if your business is a good idea. It’s a bad question, and everyone will lie to you at least a little. As a matter of fact, it’s not their responsibility to tell you the truth. It’s your responsibility to find it, and it’s worth doing right.” – Rob Fitzpatrick, author of The Mom Test.
When should I start with guerrilla testing?
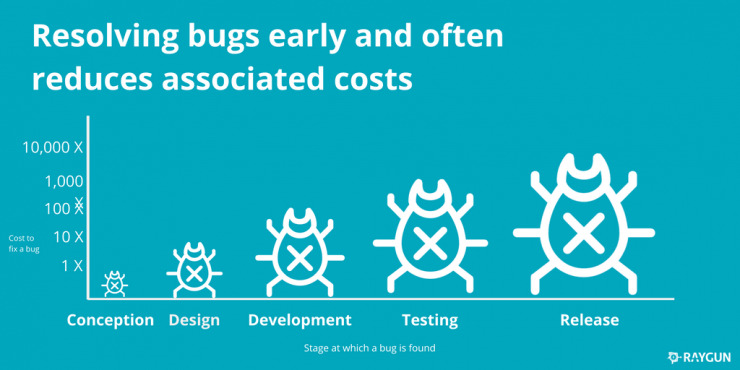
We have conducted thousands of usability tests for both our businesses (Userbrain & Simplease), and guess what? We’ve never run a test that came back with no issues at all – there’s always something to fix, remove, or improve. That’s why you should really test as early and often as possible because fixing problems will become more expensive as your product becomes more advanced, as this chart by Raygun shows:
Remember: You don’t need a finished product to experience the value of user feedback. It will be too late to fix anything if you wait to test just before launch.
Step 1: Come up with a list of tasks
The first thing is to write down a list of all the essential tasks users need to be able to do on your site. If customers come to your site to buy something, you should have a task that asks testers to purchase a product. If you want new users to create an account, ask your testers to sign up at your site. And so on…
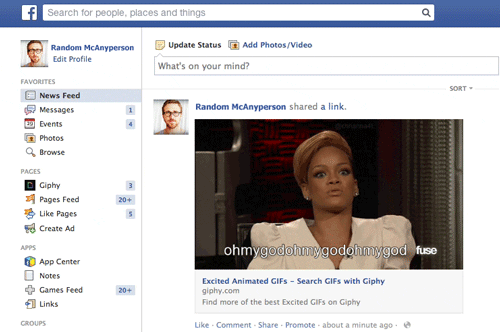
For example, Facebook’s actions would be:
- Scroll through new posts
- Update your status
- Send a private message
- Upload a photo
- Add a friend
- Change your password
Now try to do it yourself. Think about all the fundamental actions users do on your website and write down a shortlist of corresponding tasks. Oh, and don’t waste your time on details; just jot down your list. We’ll deal with the rest in the next steps.
If you’re stuck, here’s some help:
- How to write better tasks to improve your usability testing
- 6 Usability tasks you haven’t tried so far, but really should!
- 3 things you shouldn’t ask in a usability test
Step 2: Prioritize tasks and decide which to test
When you have your list, it’s time to prioritize all items by giving points from 1 to 3 based on how frequently the tasks are performed.
Add:
- +3 points to tasks that most users will do most of the time
- +2 points if they do it occasionally
- +1 point if they only perform this task every once in a while.
 So, here’s
So, here’s our list for Facebook, prioritized:
- Scroll through new posts: 3
- Update your status: 2
- Send a private message: 1
- Upload a photo: 2
- Add a friend: 1
- Change your password: 1
Don’t spend too much time on this ranking; just make sure you find the tasks most people do most of the time. Why? Because you can’t test everything in one go (not in guerrilla usability tests, anyway). And if you focus your first tests on finding and fixing problems of the most important parts, you will get the highest return on investment.
Alright, here are our 3 most important tasks again:
- Task 1: Scroll through new posts
- Task 2: Update your status
- Task 3: Upload a photo
Again, guerrilla user testing is about quick results and acting on them immediately. Just select the 3 most important tasks and get going. You can test the rest later.
Step 3: Turn your tasks into scenarios
Now it’s time to turn your tasks into a scenario your users can read, understand, and follow.
Here’s a short list of rules to write practical task scenarios:
- Don’t give clues in the scenario. You have to phrase your scenario so that it’s clear and easy to understand, but you have to do it without using uncommon or unique words that appear on the screen. Otherwise, you turn your test into a simple word-finding game.
- Make your scenario easy to follow. Write how you talk and avoid scientific or academic language whenever possible. Pre-test your scenarios with friends and colleagues to ensure they are easy to understand and people can follow them without confusion.
- Trim any detail that doesn’t contribute. Your scenario provides your users with context (“You are …”, “You want to …”) and gives them all the necessary details (e.g., username and password for the test). Everything else is unnecessary, and you should keep your scenarios short.
So let’s try this with our 3 example tasks:
Task 1: Scroll through new posts
We can’t just tell users to “scroll through new posts” without a goal. Instead of describing what to do, we can give testers a reason to do it – motivate them!
Bad: Scroll through the page to look at new posts.
This will only get your users to perform the task like a robot. Without any motivation, they will just scroll through your page, and you won’t learn anything about improving your usability.
OK: Look at this page and find out what it’s all about.
This is at least open and lets people explore the page more naturally. Just by telling them to look at the page, your chances are high that they will be scrolling through the posts to find out what it’s all about.
Good: Imagine this is the first time you’re checking Facebook today. Now go and find the first post that was published today.
Finally, this works because it gives your users a tangible goal. Instead of just telling them what to do (boring) or hoping they will do it (OK), you can give them something specific to do that will naturally motivate them to use your site (good).
Task 2: Update your status
For the next task, you must motivate testers to enter actual data (not just scroll through). Let’s look at different ways of doing it:
Bad: Write a status update and post it to your profile page.
This gives too many clues on how to use the site. People will simply look for the words “status update” and maybe a button labeled “post to your profile page.” And again, the scenario doesn’t offer any motivation or reason why you would want to update your status.
OK: Let your friends know what you’re doing by updating your status.
This explains why someone would want to update their status. But it’s still not as good as it could be. And the fact that “updating your status” is still there makes it a simple word-finding game again.
Good: Find a way to tell your friends what you’re doing and tell them you’re currently testing a website.
This works because it avoids any clues about how to use the interface. Again, it gives users a specific goal (find a way to let your friends know …) and even supplies them with the information they can use. This helps reduce the mental effort often caused by thinking about what kind of data you’re supposed to fill in during a test.
Task 3: Upload a photo
This one’s a bit tricky because we definitely want to avoid the words “upload” and “photo” (because they are on the screen), and yet we have to somehow tell our testers to upload photos…
Bad: Find a way to upload a photo.
This is too obvious to even talk about it …
OK: Find a way to share some pictures with your friends.
This one is actually pretty good. Yeah, the motivation part could be better, but sharing pictures with friends is an excellent way of framing the action of uploading photos. It makes sense, which is necessary.
Good: You were at a party last night and took some funny pictures. Now you’re looking for a way to share them with your friends.
This scenario provides an excellent context and clarifies the exercise’s goal to the user. Notice how every detail makes sense and contributes to the overall understanding. The fact that the pictures are “funny” will cause some users to take extra care of privacy settings (the word “funny” in the context of partying with friends is not necessarily something most of us want to be public).
Pro Tip: Your guerilla tests will always work as long as you get your scenario right. Making good scenarios will help you test as if you had your target audience.
Step 4: Combine all 3 scenarios
OK! We just turned our most important tasks into scenarios, and now it’s time to combine them:
- Imagine this is the first time you’re checking Facebook today. Now go and find the first post that was published today.
- Please find a way to let your friends know what you’re doing and tell them you’re currently testing a website.
- Last night you were at a party and took some funny pictures, and now you’re looking for a way to share them with your friends.
Well, that was easy. Now all you need is to start testing. But first, read on and learn how to do it:
Step 5: Start guerrilla testing – free template
As mentioned in the beginning, the secret of guerrilla usability testing is to approach people and ask them to test your site, app, or prototype. It doesn’t matter who you’re testing with; you don’t need to record the sessions. Thus, you don’t need written permissions or anything else to get started. Just walk over to someone and ask for a few minutes of this person’s time.
For better results, you can even offer a little compensation and thank you for their engagement, like free coffee or muffins. And once you’re comfortable enough to approach people like this, you will figure out the rest as you go and get better and better after each session.
How to invite test participants
Here’s what you could say when you approach people:

“Hi! We’re working on a website (app, prototype, whatever it is) and want to see if it works as intended. That’s why we’re asking strangers to test the site for a few minutes and give us some honest feedback.
Would you like to do one of these tests? Before you answer, there’s absolutely nothing you can do wrong. Plus, you can enjoy a cup of coffee, muffin, whatever, at my expense as a thank you.”
How to explain the test
Since most people don’t know what user testing is, you usually need some explaining before you can give the scenario:
“First things first, we’re testing the site, not you. So you don’t have to worry about making any mistakes. You’re supposed to point out OUR errors.
While you’re using the site, we want you to think out loud. Just say what you’re looking at, how it affects you, what you expect to happen after every interaction, what you’re trying to accomplish, and so on.
And please don’t worry about our feelings. To improve the website, we need to hear your honest reactions.”
And now comes the fun part. Just give the tester your scenario, lean back, and observe how they use your website, app, or prototype. And…
Remember to shut up.

As in the scenario, you don’t want to give any clues about how the site is used. You don’t want to lead your users – remember what The Mom Test taught us! You want to see how they figure out things for themselves; or how they don’t figure them out, which helps you learn even more! The best way to avoid leading your users is to remain silent during testing sessions. In real life, you wouldn’t sit next to them while they use your product. And you want the testing session to be as authentic as possible. Your testers will have questions; since you’re sitting next to them, they will naturally direct them toward you. To avoid any bad feelings whenever they ask you something, just tell them something like this:
“That’s a good question. I don’t want to answer it right now because we’re interested in how people use the site without guidance, but I’ll answer you after the test. But now that you have this question, what would you do if I wasn’t here and you were using this site alone?”
You will find your own way of handling questions and everything else during the tests. The only time you should talk is to remind the user to think aloud. They often go silent, especially while trying to figure something out, and that’s when you have to give them a little nudge. Remember that the goal is to have your user do most of the talking. Ideally, 100% of the time.
Discuss the questions
Once your tester is done with the scenario and has tried all tasks, it’s time to address the questions that arose during the test and maybe ask some follow-up questions yourself. If you test with people from your target audience, you may also want to turn it into a customer interview and ask if they would actually use your product. But since this is no longer part of user testing, just move on to the next step.
Step 6: Capture guerrilla testing insights
Don’t try to capture your insights during the test. Yes, that’s right. Because if you sit next to your tester and you’re writing all the time, you screw up the experience. The tester will feel stressed and wonder what you’re writing and if they’re making a dog’s dinner of it. It would be best if you only focused on observing the user and trying to decipher the subtle nuances of their behavior, their words, and the hidden meaning behind them. Yes, the tester is thinking aloud, but people are awful at getting their subconscious thoughts into the conscious and verbalizing them. That’s why you must constantly ask yourself: “Is there something more behind the thoughts they are expressing?” Your mind has to be set on observing (not writing), and you will see that you can remember everything important. And even if you forget something, you will do another test (as you’ll see in step 7), and if it’s a real problem, it will come up again.
So how do you capture your testing insights?
There are two methods that we recommend. Here’s a detailed breakdown of each one.
Method #1: List the top 3 usability problems
The most obvious way of capturing your findings is to simply list the top 3 usability problems identified in the tests:
There’s no need to write down everything you find. Guerrilla testing is about finding and fixing the most severe problems, not agonizing over every possible obstacle a user might encounter. And if you want to learn how to discover usability problems, watch this example video of Steve Krug explaining his approach (which is the blueprint for this post, in a nutshell).
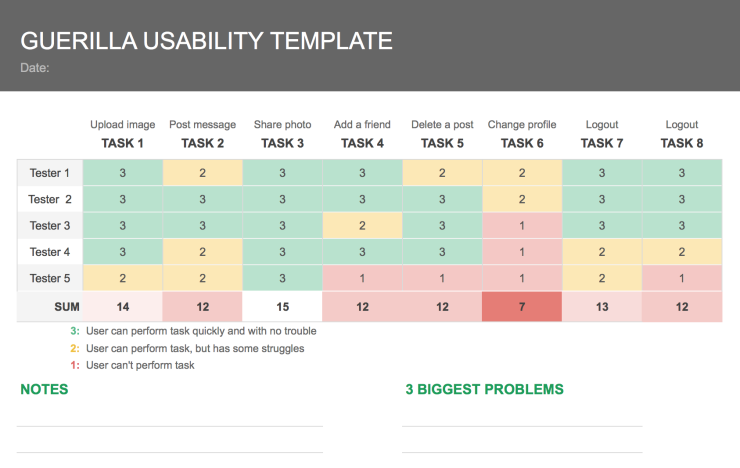
Method #2: Capture task completion
A more sophisticated way of documenting your findings is to capture the task completion for each tester. This is particularly useful if you need something to present to clients and other stakeholders. You can use the following designations:
- If a user can perform the task quickly and with no trouble, mark it a 3.
- If a user can perform the task but has some problems, mark it a 2.
- If a user couldn’t complete a task, mark it a 1.
Record your results in a spreadsheet – seriously, a bog-standard Excel doc will do the job.
Your results should look something like this:
Step 7: Fix your usability problems
As mentioned at the beginning of this article, fixing problems can be expensive – primarily if the issues affect live applications or websites. That’s why it’s wise to build prototypes and test them as early and often as possible to fix significant problems before writing a line of code. It should be an iterative process – build, measure, learn, repeat.
But what if you’re already past this prototyping phase, and the problems you’ve discovered through guerrilla testing cost your company hundreds of development hours and thousands of dollars to be fixed?
Fix the most proiminent usability problems first
“If it’s your job to eat a frog, it’s best to do it first thing in the morning. And If it’s your job to eat two frogs, it’s best to eat the biggest one first.” — Mark Twain
The attentive reader will notice a pattern:
- First, we test only the most essential tasks.
- Then we write down only the most critical problems.
- Now we fix the most prominent problems first.
And we do it quickly.
Implement quick fixes
“When fixing problems, try to do the least you can do.” ― Steve Krug, Rocket Surgery Made Easy: The Do-It-Yourself Guide to Finding and Fixing Usability Problems
Always ask yourself what’s the slightest, simplest change you can make that’s likely to keep people from having the problems you’ve observed. That’s especially true for live websites, yet many resist this idea.
In his book Rocket Surgery Made Easy, Steve Krug states that you don’t have to find a permanent solution to a problem. Just find an easy-to-implement quick fix that will likely solve the problem and do more testing to see if it works.
Tweak, don’t redesign
After you’ve done some guerilla user testing and started thinking about how to solve a problem, it’s tempting to make changes beyond the problems you observed. Sooner or later, you’ll find yourself at a point where you want to redesign whole parts of your site.
This bias towards redesigning has many reasons, and it’s easy to understand why many people like to start over to get it right this time instead of just implementing a quick fix. We’re guilty of this ourselves, but hopefully, this list (again from Steve Krug) helps us remember why it’s better to tweak than to redesign:
- Tweaks cost less.
- Tweaks require less work.
- Small changes can be made sooner.
- Minor changes are more likely to actually happen.
- Most people don’t like change, so a redesign annoys them.
- Tweaks don’t ruin lives, break up families, and wreck careers.
- A redesign means involving a lot of people in a lot of meetings. Enough said.
- A redesign means making many changes simultaneously, with the attendant complexities and risks.
- If you make more extensive changes, you’ll likely break other things that work well.
If you’re still unconvinced about quick fixes and how they are better than whole redesigns, continue with the following (and final) step of guerrilla user testing. Everything will make sense to you afterward – we promise.
Test again and make testing a habit
Usability testing works best if performed on an ongoing basis. Instead of spending time and money on elaborate usability studies to inform a significant redesign, you can implement quick fixes (step 6). The trick is to keep testing to make sure your solutions work.
How often should you test
There’s some interesting discussion about how many users you need in a usability test. A popular rule of thumb is to test with 5 users to discover the most severe problems of any application. But as always, it depends… If one user stumbles upon a significant usability bug after 30 seconds, you don’t need 4 more tests to satisfy the scientific method. In the end, this is NOT rocket science. Sometimes it’s just plain obvious, even after watching only one user. The only thing that matters is that you test regularly. This way, you can see if your tweaks really solve the problem, and you make sure to spot any new issues that your changes may cause.
Make testing a part of your workflow
The reason why guerrilla testing is oftentimes better than traditional usability testing is that you can afford to do it on a regular basis, and I’m not only talking about money. Guerrilla usability testing is fast and easy and cheap, it’s effective as hell, and there’s no excuse not to do it. At the end of the day, guerrilla usability testing comes in many forms. Consider making up your own approach as you go: learn by doing.
Examples of guerrilla testing
Some examples of outstanding guerrilla testing:
- Airbnb Guerrilla Usability Testing
- A Guerilla Usability Test on Dropbox Photos
- Guerrilla Usability Test: Yelp
- Changing the Guardian through guerrilla usability testing
But if an hour of your time is more valuable than $40, you can resort to remote usability testing. Remote user testing removes the scheduling, travel, paperwork, and setup challenges. You can shave off days, or sometimes weeks, by testing remotely. That’s where Userbrain comes in. Userbrain provides easy, fast, and affordable user testing with generous monthly subscription plans starting from just $99.
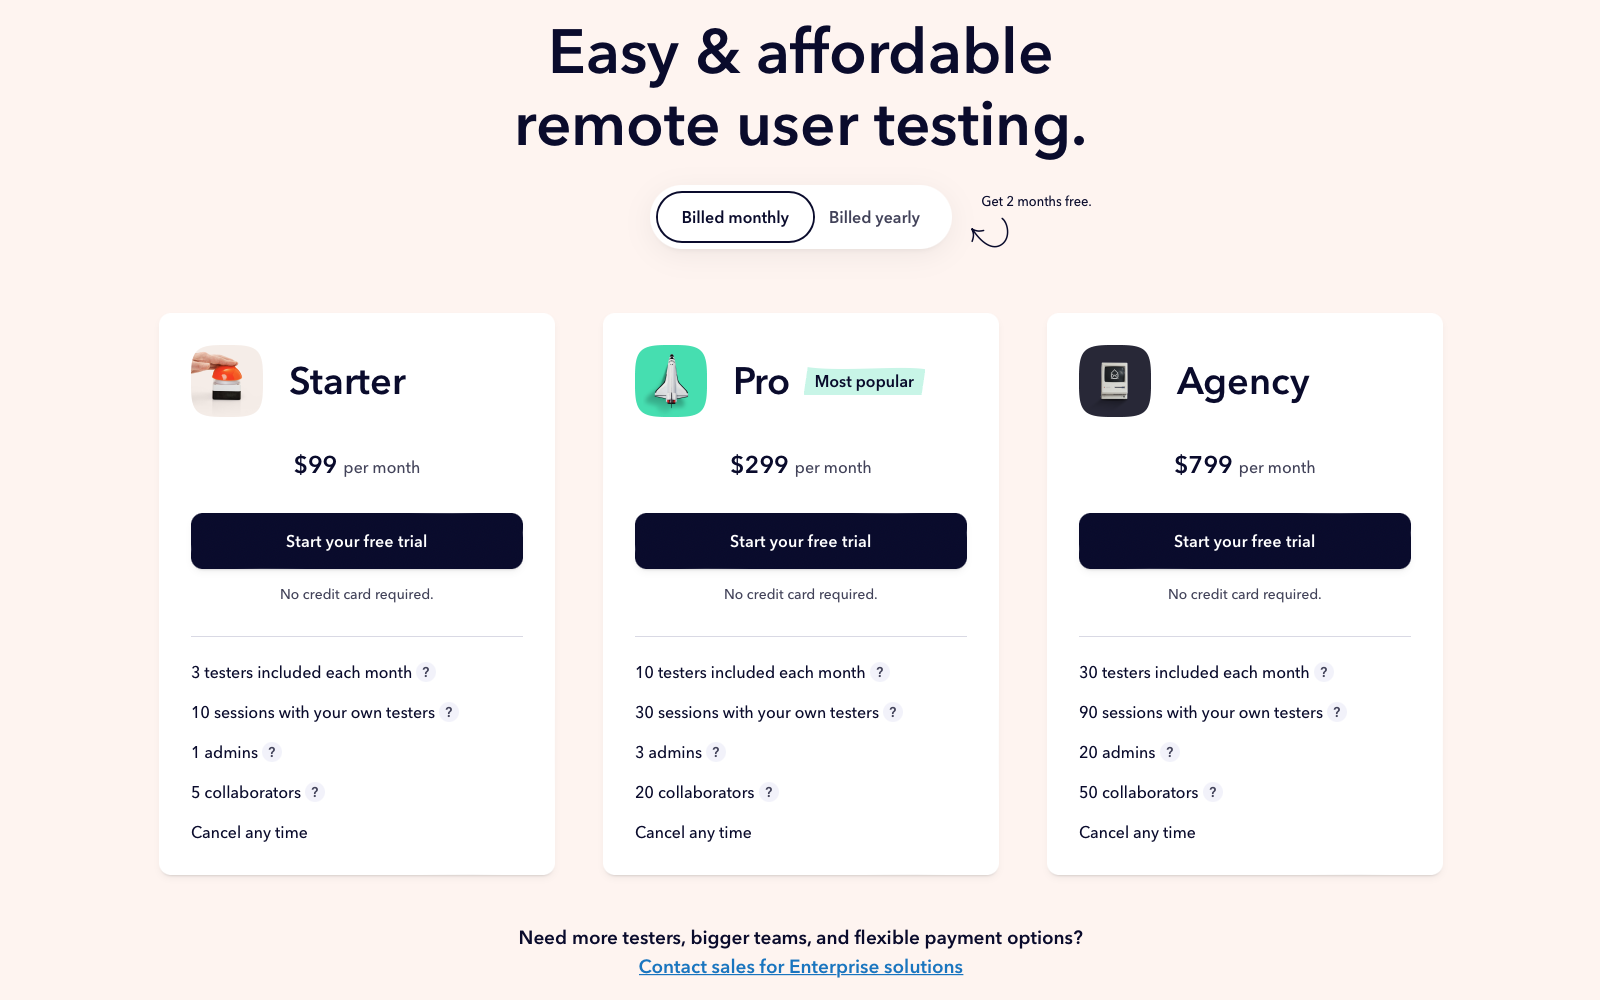
No matter what your budget or how many tests you need, Userbrain has you covered. Check out our subscription plans. Starting from just $99 monthly.
It’s time to start user testing
Start your free trial today and see the difference that user testing can make for your product.
Schedule a call with us if you have any questions – we would love to hear from you!
Book a live demo with one of our resident UX experts.